Wednesday, December 22, 2010

More floors (again)...

So at this point, I managed to score a floor section off of ebay that is original, but damaged. These suckers cost over 500.00 to buy (rip off) if you buy them complete...I opted to buy the damaged one that was just missing the bottom braces and had a cut in the metal. Big deal. Easy fix, cost me 90.00 instead of 500.00. I simply welded two pieces of U-channel underneith for support, and ended up trimming the back anyways. Here you can see the back cargo section mounted, with two carrier bolts securing it to the frame. I re-used some rubber pads off of Betty, my 1950 Buick underneith the bolts.


Here is the front driver floor, where it meets the riser. You can also see the cargo area stitched in. This will all be covered in seam sealer and then shot with U-pol bed liner.


Here's the front of the driver's side, with the matching diamond plate kick piece that helps hold the two seams together.


The center bolt-on sections were sandblasted, and the one repaired. At this point, the bottom side is painted in Eastwood's rust encapsulator, which gives you a bullet-proof rust inhibitor. Next they'll be bolted in place and the front should be ready to seam-seal.

Sunday, December 12, 2010

More floors.....

So I took a trip back down to the sandblaster to clean up the center sections of the floors. These sections bolt in, which make it easy to remove for transmission bolt removal...I guess whatever else you wanna do down there. Unfortunately, the sandblasting not only took off 40 layers of paint, but exposed the weak metal under the gas pedal / area where the right foot would be. I opted to cut that section out and replace with fresh metal, which was a pain considering how thin the metal was here.


Here we're marked and ready to cut.


Here the spot welding is done on the center section. It will need to be seam sealed to fill in the little holes as this piece is impossible to weld 100%. I'll end up riveting this piece down so if it does need to be removed, you can just drill the rivets out. I might bolt it down...I haven't 100% decided yet. Lots of welding to do over on this side, but the overall pieces are mocked up, tacked up, and ready to go.

Sunday, December 5, 2010

Fan-tetanus!

So the next order of business was the get the rest of the rusty crap cut out of the jeep so I could start putting the floors back together. The biggest pain of all of this is that the step riser that transitions between the cargo area and the front floors was rotted out everywhere. The only thing salvageable on the entire floors is the tool box, located below the passenger seat. This had been replaced at some point in the jeeps life...luckily....replacements are 300.00. Luckily when someone replaced it, they undercoated it as well. The passenger floors had already been replaced by me over the summer, so armed with my newly acquired plasma cutter, the rear cargo area was cut out (both the upper galvanized riveted crap the previous owner put down) and the rusty underneath, the and the riser. With rust scale flying, falled, splattering, and smoke flying everywhere from burning seam sealer and old bondo....we had fun. Pictures look like crap from so much smoke and dust in the area. Here's everything stripped down except for the riser, which you can see rotted out running along side the tool box on the passenger side.


In the two upper pictures, you can see the new u-channel riser spot-welded into place. Everything works around this riser, so it had to start there. If you look right to the left of the crow-bar...you can see where the plasma cutter cut right through 2 layers of sheet metal and right through the frame cross member...lol. (Click on any pic to bring it up in more detail)


Here's a quick mock-up of the floors on the driver's side. The hole in the metal is where the fuel feed line runs under the car (keep in mind the gas tank is directly under the seat in CJ5's older than the early 70's.) The transmission shifter plate will be sandblasted and then sprayed in the same U-pol truck bedliner coating that the rest of the interior will be painted in.

Tuesday, November 30, 2010

Fresh engine bay!

Motor in....


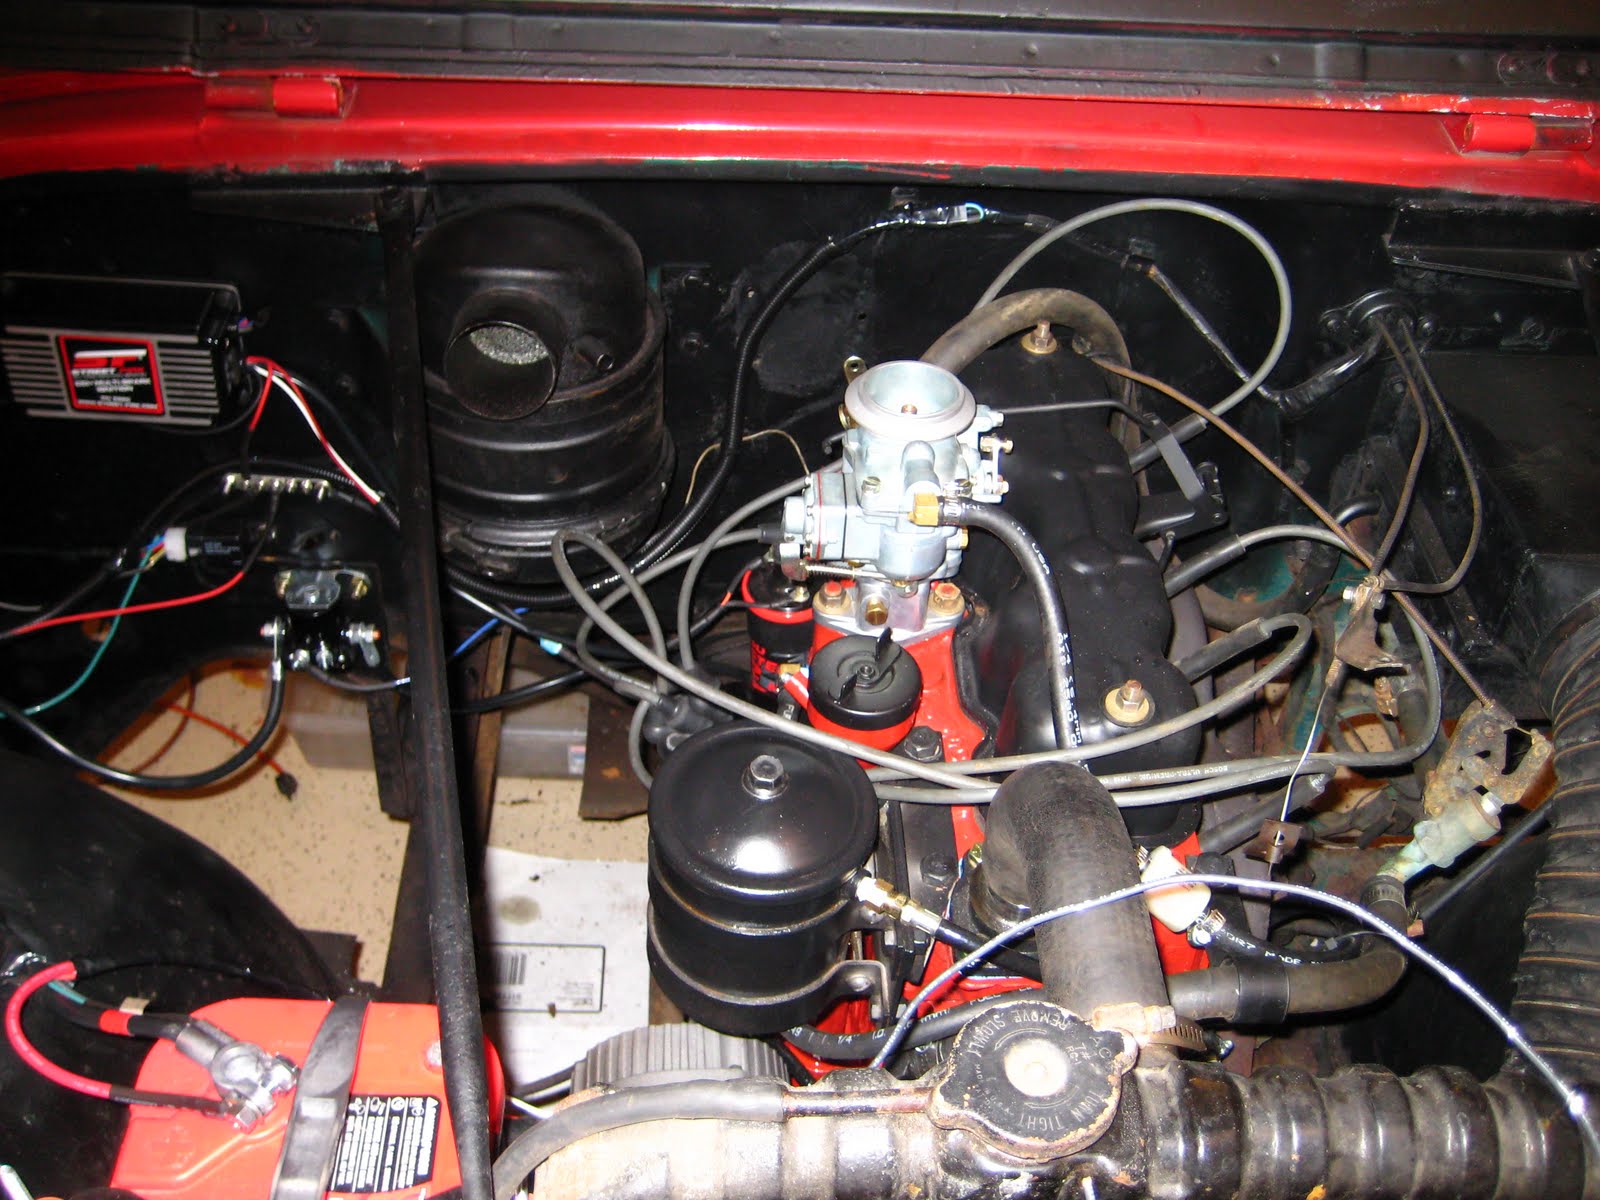
Ahhh... Much better. Engine bay painted, and the motor back in. A few upgrades needed to be done to pull the motor out of 50's outdated technology. For one, I fabbed up a bracket to mount a standard Delco 10si alternator (60 amp) on the Jeep, and wired it, along with a MSD street fire ignition in. The street fire is a lower cost version of the classic MSD box but has all the same features. I used the original points in the distributor as the trigger mechanism (simple, easy) and this supplies the signal to the MSD box and coil which make WAY better spark than old 50's components. Plus, the 60 amp alternator is way better than the original 20/25 amp generator. I wired in a standard Ford starter solenoid and eliminated the old aluminum can one that mounted on the starter. Out went the old voltage regulator since the 10si is an internal regular and wholla....much cleaner.


New alternator / brackets


Above the solenoid is a constant 12V marine buss that I can tap any constant 12V source I need, plus serves as a good spot to mount the voltage sensing wire coming off the alternator.
Makes it a little easier than splicing wires everywhere. I also have 2 wires that are switched power for the MSD box and any other accessories. I'm wired in the stuff for an electric fan using a 4 pin relay off of the 12V buss, with switched power for the trigger...of course.


So Sunday (Nov 28) we fired her up! Runs like a champ! Now, I just have to clean up a little more wiring and its onto the floors inside. The passenger side is done already and was done earlier in the summer. The drivers side still has to be done.

Motor out.

So now it was time to rip the motor out. Both the floors and motor were done in June, 2010 (this summer).


This is what 25 year old anti-freeze does. Turns into crystal crud. Don't sniff it!


Rockers were surprisingly clean. And so was the rest of the motor when I took it apart. I had hardened seats in the valves, so my guess is that it was rebuilt at some point in the late 70's / early 80's. I checked everything over good, had the head shaved .080 to raise compression a bit, checked the bearings and everything looked good, painted her up, fresh gaskets, and back together. The stock carb was broke, and the points the previous owners installed in the distributor were not installed right. The thing never would have started.


Here's the motor just before removal. For some reason, I got no pics of pulling it!

Floors out.

The following summer, a few things happened. One, the completed Jeepster (Captain Aardvark) was sold. The cleared room for me to get started on Red. I started first by ripping the motor out. I wanted to take the motor down and rebuild it, clean the engine compartment and re-paint, and start ripping the floors out for re-do.

I'm telling ya....this whole riveting galvanized sheet metal in for floorboards crap has got to stop. The rear of the Jeepster had it. This damn Jeep has it. What this hell is with this crap? Was there an influx of duct-workers who decided to take on body work in the early 80's and did it on Jeeps? All this crap had to come out...both sides...and it sucks because you have to grind and rip the rivets out. The rear cargo area is the same thing. The passenger side floor I bought a pre-fabbed piece that I'm going to use most of...all the rest is either fabbed on spot, or I had Zinger sheet metal fab me pieces based off of what I mocked up. They make a living using a press-brake....not me :)


This is what the passenger side looked like before the entire center section was ripped out.


Completely ripped out and ready for new metal!


Yes, they ACTUALLY used a piece of wood for a body mount. I know jeeps are pretty "universal"...but this is crazy.

Red.

So one day at work, one of my employees was talking about how he had an old Jeep that he'd been fussing with and was basically "over it". I had just picked up the Jeepster earlier in the summer and was head-long into it at the time, so at the beginning of the conversation, I was just listening...and curious. I figured he had some mid-70's run of the mill CJ7 like everyone else and when he told me it was a 55' CJ5...my ears perked up. I always wanted a flat-fender (CJ2A / CJ3A) and I guess this is the next closest thing being it was the first year of the CJ5. He told me the motor hadn't ran in a long time, and the thing had been sitting in a barn for almost 25 years. I then asked him what sort of money he wanted to get out from under it. When he told me 1500.00...I figured it couldn't be anything good. I went to look at it. I come home with another Jeep....and a very "concerned" wife.


Red was a good deal. Probably one of the better ones I've had. The body had been painted in single stage (probably enamel) 20 some years ago, and other than one paint fracture on the cowl that got rust under it, the paint simply needed to be wheeled out. I know...I should have knocked 100.00 off for the busted antenna...right? Lol.


The floors were shot. The motor hadn't run in decades...but it turned over. They said they couldn't get it to fire. There was no gas tank (it goes under he seat). Other than that, this was going to be easy.


But... I had other priorities to get done first, so Red got wrapped in a tarp and put on the side driveway...to sit....one whole winter. Poor guy.